If you’ve ever spent more time formatting than actually creating, you’re not alone. Scribus is powerful—but without the right approach, it can feel like you’re stuck doing the same tasks over and over again.
You’re here because you want to stop wasting hours on layout tweaks and start producing consistent, professional documents faster. That’s exactly what this guide will help you do.
Instead of walking through the usual tool-by-tool tutorial, we’re diving into what really makes the difference in large projects: scribus protocol optimization. We’re talking about the repeatable workflows and internal settings that cut production time without cutting corners.
This isn’t theory—it’s built on hands-on experience managing complex publications in Scribus. You’ll learn the same systems pro designers use to move quickly while keeping everything clean, consistent, and on-brand.
By the end, you won’t just use Scribus more efficiently—you’ll run it like a production-grade layout engine.
The Core Protocol: Mastering Styles for Global Control
To fully leverage the benefits of protocol optimization techniques in Scribus networks, it’s essential to explore complementary innovations such as those discussed in our recent article on Feedworldtech, where we delve into cutting-edge technology that enhances overall network efficiency.
Let’s get one thing straight: manually formatting every text element in a document is a recipe for chaos (and carpal tunnel). Styles aren’t just a nice-to-have—they’re essential. A style-first workflow anchors your design system, letting you make sweeping, document-wide changes confidently and quickly. Whether you’re working on a single brochure or prepping a multi-page manual, styles enforce consistency and eliminate repetitive tweaking.
Why a ‘Style-First’ Workflow Is Non-Negotiable
Imagine reformatting every heading in a 48-page document one-by-one. Now multiply that across five projects. Oof. With predefined styles, a single tweak—say, changing your heading font—instantly updates every instance. That’s efficiency. That’s scribus protocol optimization.
Building Your Style Hierarchy
Not all styles are created equal. In Scribus, text formatting is driven by two core types:
- Paragraph Styles: Control overall formatting like alignment, line spacing, and indentation. Great for anything that sits alone—headlines, body text, bullet points.
- Character Styles: Override specific words or phrases without altering the paragraph style. Useful for emphasis or inline formatting.
Pro Tip: Use parent styles for scalable workflows. For instance, Body Text can be a parent to Body Text Indented, inheriting fonts and size but with added indentation—like CSS, but for documents.
Practical Application: Essential Styles to Set Up
Create these foundational styles:
- H1 – Use bold font, set spacing above/below.
- H2 – Slightly smaller, less line spacing than H1.
- Body Text – Set paragraph spacing, justified alignment.
- Caption – Smaller font, lighter color, optional italic.
- Bullet Points – Left-aligned with custom bullet symbol.
Naming Convention: Keep it simple and hierarchical (e.g., Header H1, Text Body Primary) so other designers or future-you can interpret quickly.
Efficiency Hack: Importing Styles
Here’s where the magic happens. Instead of reinventing the wheel, import styles from a previous project or template:
- Go to File > Import > Get Text or use Style Manager.
- Choose a Scribus document with pre-configured styles.
- Select and import only the relevant ones—or all of them, if you’re feeling bold.
This instantly aligns new documents with your existing design system.
(Consistency really is the ultimate flex.)
Optimizing Object & Asset Handling Protocols
“I can’t tell you how many times I’ve manually added page numbers… only to have them fall off alignment,” said Maya, a freelance layout designer who’s spent years working with complex publications.
Master Pages: Your Blueprint for Consistency
If you’ve ever copy-pasted the same footer onto 200 pages, there’s a better way. Master Pages are your backstage pass to consistency. With just a few clicks, you can define headers, footers, automatic page numbers, and column guides across your entire document. Maya joked, “It’s like setting up house rules—the moment new pages arrive, they already know how to behave.”
The Scrapbook: Your Library of Reusable Assets
Think of the Scrapbook as your personal creative vault. Instead of hunting down that same logo or reformatting bio text 10 times over, drop them into the Scrapbook once. File them under frequently used assets like icons and branded taglines. Need them later? Drag, drop, done. As studio lead Jonah told us, “Without my Scrapbook, I’d probably cry during every brochure project.”
Image Frame Protocols: Setting Smart Defaults
Tired of resizing every image you add? Set your image frames to default to Scale to Frame Size and pre-define text wrap settings. This trick saves hours—and sanity. It’s a small adjustment, but a huge protocol win. (Pro tip: Combine this with frame styles to future-proof your layout.)
Managing Layers for Complex Documents
Layers aren’t just for Photoshop. In large layouts, separating text, visuals, and backgrounds into distinct layers prevents what Jonah calls “layout soup.” You can lock backgrounds, adjust text without nudging images, and keep everything clean.
That’s the heart of scribus protocol optimization—create the rules once, and let your creative tools work smarter.
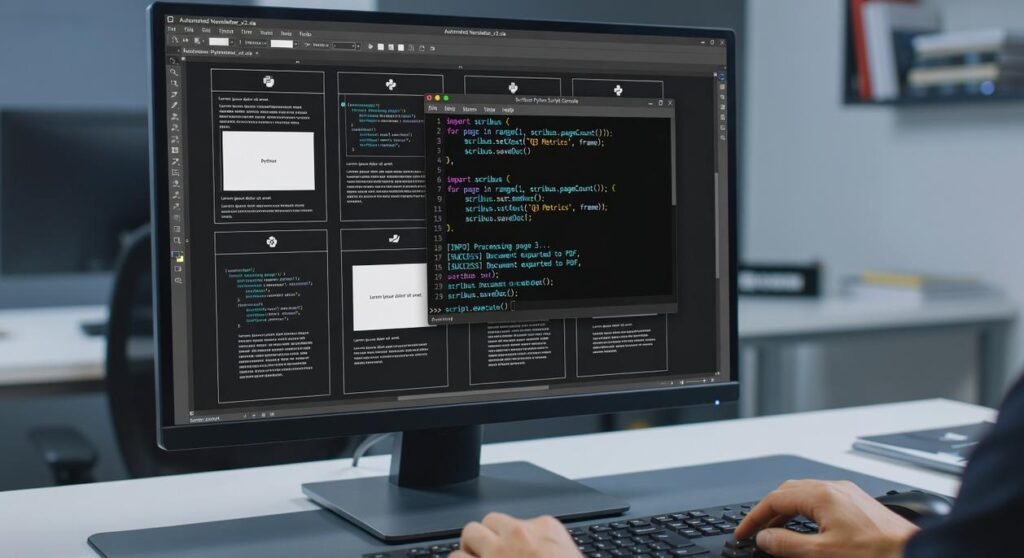
Advanced Protocols: Automation with the Scribus Scripter

Have you ever found yourself clicking through the same ten steps, again and again, just to apply a font or resize an image in Scribus?
If so, you’re not alone—and you’re probably overdue to meet Scribus’s built-in Python Scripter. It’s more than a hidden gem; it’s the ultimate shortcut for reclaiming your time and sanity. Think of it as the scribus protocol optimization tool for tasks that are too repetitive for manual labor.
What is a Scripting Protocol?
At its core, a scripting protocol is just a set of instructions that tells Scribus what to do—automatically. Sounds intimidating? It’s not. Imagine you could:
- Apply a custom style across every text frame in seconds
- Resize every image on a specific page to 50%—with a single command
- Batch rename objects based on layer or page number (yes, seriously)
Now ask yourself: why wouldn’t you automate that?
Case in point: Need to replace a specific shade of blue used across 60+ pages? Manually, that’s an afternoon. With a simple script? It’s under a minute. (Who says automation sucks the soul out of creativity?)
Where to Start
You don’t have to write scripts from scratch. Head to the Scribus Wiki or search GitHub for ready-to-use examples. Many are plug-and-play, even for beginners.
Pro Tip: Modify an existing script before building one from zero—it’s the fastest way to learn without breaking anything.
Fine-Tuning Scribus Preferences for a Faster Workflow
If you’ve opened Scribus and instantly felt overwhelmed by sluggish image rendering or tools that never behave the way you want—you’re not alone.
Let’s break it down.
The Preferences dialog in Scribus is your command center. Think of it as customizing the cockpit of a plane before takeoff. You’re not changing how Scribus functions for others—just tailoring how it responds for you.
First up: Display Performance. Scribus lets you switch image previews to low-resolution. Why? Because full-res images in large projects can slow navigation to a crawl. Working in hi-res isn’t necessary until export—so toggling this frees up resources fast (Pro tip: Check File > Preferences > Display for this setting).
Next: Default Tool Settings. Let’s say 90% of your text is in Open Sans, size 11, with dark grey lines. Instead of redoing this every single time, set the default:
- Text Frame: font, size, alignment
- Shape Tool: color fill, stroke width, etc.
This tiny shift creates major time savings.
Now for the real magic: Keyboard Shortcuts. Personalize keys for actions like:
- Apply Paragraph Style
- Toggle Guides
- Group/Ungroup Items
Truth is, this is the fastest way to level up. It’s why scribus protocol optimization isn’t just for power users—it’s essential for anyone ready to streamline.
Clunky defaults slow you down. Tailored preferences? They open the throttle.
Your New High-Efficiency Scribus Workflow
You came here to end the frustration of repetitive formatting in Scribus—and now, you have a clear roadmap to do just that.
No more wasting time with manual tweaks and inconsistent layouts. That old workflow? It stops here.
By implementing systems built on styles, master pages, automation, and smart defaults, you can finally turn Scribus into the efficient, professional-grade tool it’s meant to be.
You now understand the power of scribus protocol optimization—a framework that transforms your entire approach to design.
Here’s what to do next: Pick one protocol from this guide—like setting up your core paragraph styles—and try it on your next project. It’ll save you time instantly and show you how fast professional consistency can become your new standard.
Thousands of designers have boosted their output with this approach—now it’s your turn.
 Jerold Daileytodds is the kind of writer who genuinely cannot publish something without checking it twice. Maybe three times. They came to ai algorithms and machine learning through years of hands-on work rather than theory, which means the things they writes about — AI Algorithms and Machine Learning, Tech Toolkit Solutions, Scribus Network Protocols, among other areas — are things they has actually tested, questioned, and revised opinions on more than once.
That shows in the work. Jerold's pieces tend to go a level deeper than most. Not in a way that becomes unreadable, but in a way that makes you realize you'd been missing something important. They has a habit of finding the detail that everybody else glosses over and making it the center of the story — which sounds simple, but takes a rare combination of curiosity and patience to pull off consistently. The writing never feels rushed. It feels like someone who sat with the subject long enough to actually understand it.
Outside of specific topics, what Jerold cares about most is whether the reader walks away with something useful. Not impressed. Not entertained. Useful. That's a harder bar to clear than it sounds, and they clears it more often than not — which is why readers tend to remember Jerold's articles long after they've forgotten the headline.
Jerold Daileytodds is the kind of writer who genuinely cannot publish something without checking it twice. Maybe three times. They came to ai algorithms and machine learning through years of hands-on work rather than theory, which means the things they writes about — AI Algorithms and Machine Learning, Tech Toolkit Solutions, Scribus Network Protocols, among other areas — are things they has actually tested, questioned, and revised opinions on more than once.
That shows in the work. Jerold's pieces tend to go a level deeper than most. Not in a way that becomes unreadable, but in a way that makes you realize you'd been missing something important. They has a habit of finding the detail that everybody else glosses over and making it the center of the story — which sounds simple, but takes a rare combination of curiosity and patience to pull off consistently. The writing never feels rushed. It feels like someone who sat with the subject long enough to actually understand it.
Outside of specific topics, what Jerold cares about most is whether the reader walks away with something useful. Not impressed. Not entertained. Useful. That's a harder bar to clear than it sounds, and they clears it more often than not — which is why readers tend to remember Jerold's articles long after they've forgotten the headline.